Dowload version 1.03 as a zip here
News in version 1.02
- Rotation
- Frame by frame render (for skew animation)
- Movie length indication in Speed dialog
- Crop to avoid shadows being cut off
This Manual is formed as a tutorial describing the steps to make a movie with 3D effect, which includes all settings.
 Initialization
First step is to render the key frames in Kalles Fraktaler, which can be downloaded here.
Zoom size must always be set to 2.
Please note that the key frames needs to be at least twice the width of the movie.
Larger with gives more antialias.
You also need to have a higher height ratio than the resulting movie, due to the applied perspective.
A suggestion is the render the key frames in 3840x3840 for a movie of 1920x1080.
Use Kalles Fraktaler Arbitrary Size option to set the ratio you need.
For 1920x1080 movie:
1x1: 640x640 -> 3840x3840(minimum) -> 5760x5760(good quality) -> 7680x7680 (extra quality) the 3D projection angle must be greater than 40o
16x18: 640x720 -> 3840x4320 (minimum) -> 5760x6480 (good quality) -> 7680x8640 (extra quality) the 3D projection angle must be greater than 35o
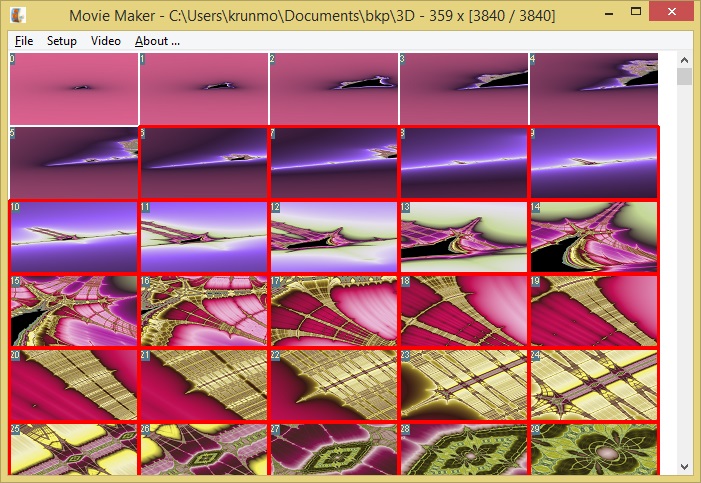
When the key frames from Kalles Fraktaler, KFB, are completed, open MMY3D and select the folder with the menu command "File->Folder open..."
You will be prompted that there are no KFY files and asked to convert the existing KFB files, choose yes.
You will then be prompted to select the size of the preview images of the frames.
If you need space on your hard drive, you can delete kfb and jpg files.
When the convertion is complete, all preview images of the frames will be visible in the main window
The frames of interest needs to be selected by holding shift for multiple selection.
The selected frames will be indicated with a red border.
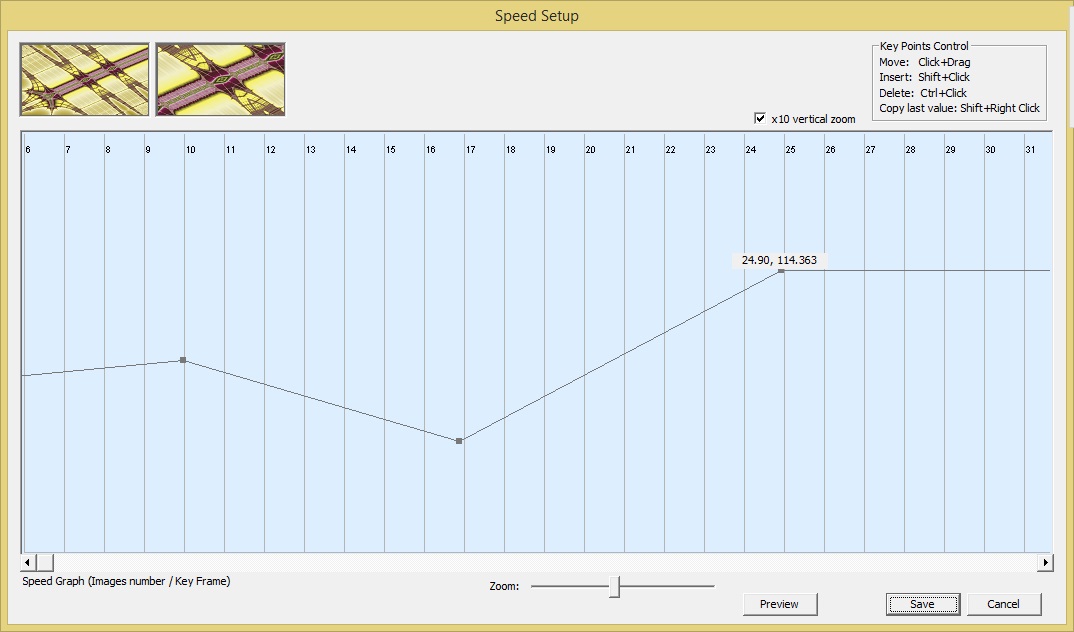 Speed setup
From the menu "Setup->Speed Setup..." The Speed Setup windows is opened.
The selected frames are listed and different speed can be specified for each key frame
New values are added by holding shift and click
Speed values can be moved by click and drag
Speed values can be deleted by holding control key and click
The check box "x10 vertical zoom" can be unchecked to be able to enter higher values
The zoom of the graph can be changed by draging the zoom control.
Video Browser (Here VLC) is the media player used for avi file created when press Preview button in Speed or color setup
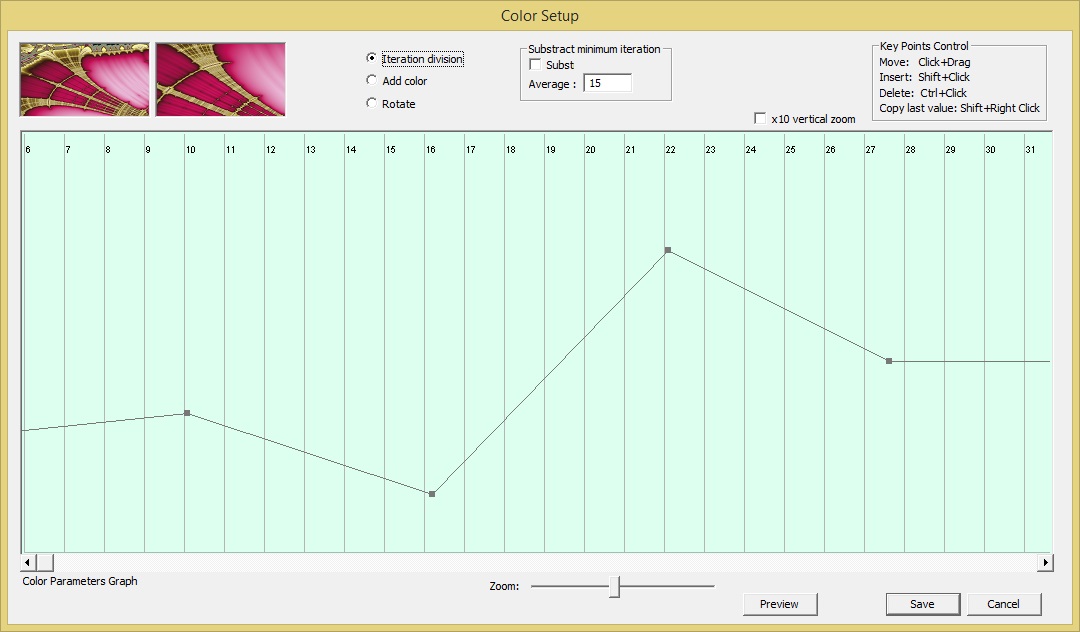 Color setup
From the menu "Setup->Color Setup..." The Color Setup windows is opened.
This window works as the Speed Setup window.
Colors can be manipulated in 3 ways:
| 1. | The iteration division can be changed. Lower value will give more dense colors |
| 2. | Add color. Add an offset to the palette |
| 3. | Rotate. Rotate the palette |
 Relief setup
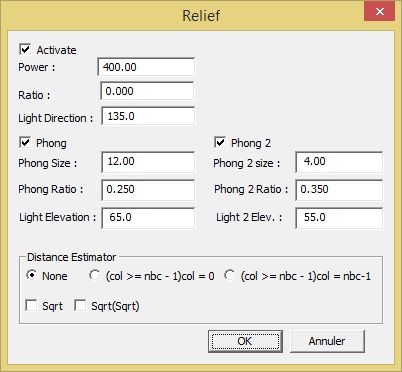
From the menu "Setup->Relief..." the Relief dialog is opened
Here brightness are applied on the slopes of the patterns, from a light source.
Checkbox Activate indicates if this effect will be applied
Power is defining the strenght of the relief effect
Ratio is defining how much the relief effect will be applied, 0 means no effect, 1 means max effect.
If Power is low and Ratio is high, the relief will be thin and distinct.
If Power is high and Ratio is low, the relief will be large and soft.
Light direction is defining the direction of the light
Two Phong effects can be specified.
These defines smaller and stronger light reflection effect and gives a shining result
Phong Size defines the size of the light reflection. A small size (1.0) give a large shinning zone, a big size (15.0) give a very small (thin) shinning zone (As in ray tracer).
Phong Ratio defines how much effect will be applied, 0 means no effect and 1 means max effect. Good range is [0.05, 0.3] Tip : Set to 1 to see where phong appear and don’t forget than Power as a big effect on where the phone will appear.
Light Elevation Is the angle (range 0-90o) between ligth and horizontal plane from where the phong reflexion is computed. If angle is low phong appear on big slope, if big phong appear on low slope (quasi plane surface).
Distance Estimator defines if distance estimation is to be applied
col>=nbc-1)col=0
col>=nbc-1)col=nbc-1
- nbc is the number of color in the palette. nbc-1 is the last color of it. When distance is very low you can decide to use last color (col=nbc-1) or first color (col=0). Its usefull to make multi-layer in video composition.
Sqrt means that slope will be square rooted, which will smoothern out big changes in iterations
Sqrt(Sqrt) means that Sqrt will be applied twice, for more smoothering
 3D Setup
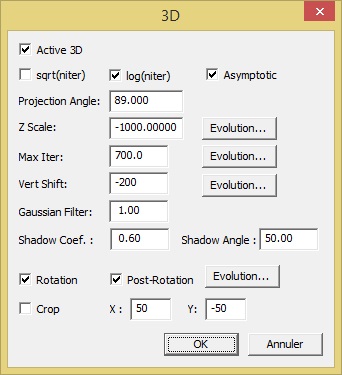
From the menu "Setup->3D..." the 3D dialog is opened
Activate 3D indicates if 3D effect is to be applied
z is Z Scale*function(niter-ExponentialAverage(MinimumIteration(InFrame),Average)
sqrt(niter) means squaring iteration values before used as z-axis, function(z)=sqrt(z)
log(niter) means logarithming iteration values before used as z-axis, function(z)=log(z)
Asymptotic means means function(z)=0.63661977*atan(z / MaxIterCur)*MaxIterCur f(z)=z if z is very small, f(z)=MaxIterCur if z very big
Projection angle is the perspective angle, between 0 (from the side) and 90 (from above).
The less value of the projection angle used, the more high ratio is needed for the key frames.
Z Scale is the scale of the iteration values used for hight. If negative, the projection will be concave.
Z Scale value can be changed via a settings dialog similar to Speed. It defines a graph of a multiplicative factor applied to
Max Iter means function(z)= min(z,Max Iter) min is applied before sqrt log atan. Max Iter value can be changed via a settings window similar to Speed. It defines a graph of a multiplicative factor applied to Max Iteration along the movie.
Vert. Shift means the amount of pixels the images will be moved, up or down.
Different projection angles needs different values of this field.
Vert. Shift value can be changed via a settings window similar to Speed. It defines a graph of a multiplicative factor applied to Vertical Shift along the movie.
Gaussian Filter means exp(-gf*d^2) average is applied on each pixel, where d is the distance in pixels from the computed pixel and its neighbors. gf calculated for that the value of exp is 1% when d is the Gaussian Filter parameter given (Not simple to explain in two words). The value is relative to 1920. If an other video width is used it is multiplied by VideoWidth/1920. It is the same for Z Scale and Vert. Shift.
High value takes longer time to render
Shadow Coef. means how much shadow effect will be applied. 0 is max and 1 is no such effect.
Shadow Angle means the angle of shadows. 90 means no shadows and 0 means maximum shadow lengths
Rotation indicates if rotation is to be applied. The rotation will be applied on the iteration buffers and requires large key frames to avoid alias artefacts.
Post-Rotation if this box is checked the rotation will be applied as the last step. This makes rotation work with smaller key frames however makes the result somewhat blurry.
Crop will crop the edges of the final movie to avoid shadows being cut off. X is positive and Y is negative.
 Color Palette
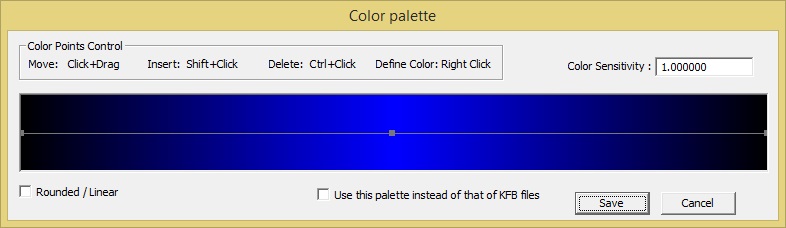
From the menu "Setup->Color Palette..." the Color Palette dialog is opened
Here points can be added to a 512 colors palette:
Color Sensivity means a global parameter which grow div and decrease rotation
Rounded / Linear means Linear: Interpolation of colors between to points is linear. Rounded: Interpolation of colors between to points is made with cosinus function. Use this palette instead of that of KFB files indicates that only this palette will be applied.
Click+Drag to move points
Shift+Click to add points
Ctrl+Click to delete a point
Right Click to define a new color
From the menu "Setup->Compute One Frame..." calculates one of the selected frames for display only
Tip: Set video parameters temporarily to low values for fast preview of selected frame!
This is very useful when trying different settings, especially changing all Relief and 3D Setup settings.
From the menu "Setup->Flip Horizontal..." the images is flipped horizontal, to use the same (incorrect) layout as Kalles Fraktaler
 Accelerate
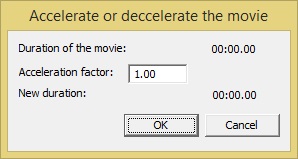
From the menu "Setup->Accelerate..." the Accelerate or deccelerate the movie dialog is opened
This is a quick way to make everything faster or slower
The Acceleration factor controls the effect
 Video Parameters
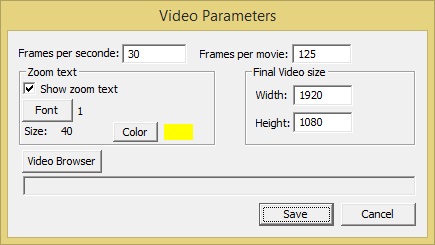
From the menu "Video->Video Parameters..." the Video Parameters dialog is opened
Frames per second sets the frames per second, 30 or 60 is recommended
Frames per movie sets the movie length. It is recommended to use the value 500 for a movie of size 1920x1080. This is because raw AVI format usually have an upper limit of file size
The size 1920x1080 is the recommended size for a HD movie, however you can make a smaller preview movie with lower values, which will be rendered significantly faster
Show zoom text indicates if zoom text is to be displayed or not
Font button selects the font.
Color button selects the color of the text.
Final Video size set the final video size in Width and Height.
Video Browser (VLC is recommended) is the media player used for avi file created when press Preview button in Speed or color setup
Start the video render.
Abort an ongoing video render
Changelog
2016-02-10 - first version
2016-02-22 - time estimation added to Speed and similar dialogs